 AnyEmail Setup Guide
Setup
Usage Config
 Setup and installation
AnyEmail is a single
self-contained PERL script, it does not require any non-standard perl
modules (no need for moudles such as Net::POP3 and MIME::Base64).
The MIME parsing code (used by AnyEmail and AnyBoard)
developed by Netbula is many times faster than the open source modules.
AnyEmail setup is
very simple, because it has only two things to set in the script.
After the above changes, you must install AnyEmail as a CGI script. How to do it depends on your web server. Consult your web server's FAQ on this.
Optional POP3 settings
- $fixed_pop_server
- This is used to set a default POP3 server, when this is set, user don't have to enter the full email address. For example, if $fixed_pop_server is set to netbula.com, to retrieve email for support@netbula.com, one only need to enter support in the login window.
- $use_fixed_popserver_only
- When this is set to 1, a user can only access email from the POP3 server specified in the $fixed_pop_server.
- $non_changeable_from_address
- When this is set to 1, the user can not change the from address in the send message form.
- $fixed_return_domain
- If only user account is entered in the login window, the return address is set to userid@$fixed_return_domain. For example, if $fixed_return_domain is set to netbula.com, and $fixed_pop_server is set to pop3.netbula.com, and user entered support in the login window, then email is retrieved from pop3.netbula.com and return address for outgoing email is set to support@netbula.com.
-
- %email_to_pop3_map
- This variables allows you set a map to map email domain address to POP3 servers, so user do not have to enter the POP3 server name when the email domain and POP3 address does not match.
-
-
- Other settings
$broke_pathinfo
- Some web servers (such as IIS) does not suppor the PATHINFO, the result is a server error when user trying to view attachments using AnyEmail. In this case you should set $broke_pathinfo = 1;
 AnyEmail Usage
Now, you can read and send email through AnyEmail.
Access email from your POP3 account
To read email, AnyEmail needs to login to the POP3 server with your userid and password and retrieve messages. In most cases, the POP3 server's name is the same as the domain name in your email address. For example, for support@netbula.com, the user account is support, and the POP3 server is netbula.com. To read messages, simply enter the email address (support@netbula.com) and the password into the login form.
In the case when the POP3 server is different than the domain name in the email address, enter the POP3 server name after the email address, separated by a /. For instance, suppose the POP3 server for support@netbula.com is pop3.netbula.com, the Email field should be entered as
support@netbula.com->pop3.netbula.com
AnyEmail stores the email addresses you have accessed on your computer, next time when you use AnyEmail, you don't have to enter the address again, instead you can select it from the addresses in the drop-down list on the right hand side of the login screen. Once logged in successfully, you will be brought to a page like this

Click here for detail
The messages are listed in reverse order of the time (with most recent ones on the top), clicking on a header will sort the list based on the header field. To read a message, simply click on the subject of the message. Click on the sender address allows you to see the full header of the message.
To delete messages, check on the boxes left to the subjects, and then click on the X graphic, the checked messages will be deleted immediately.
Send/forward/reply to email
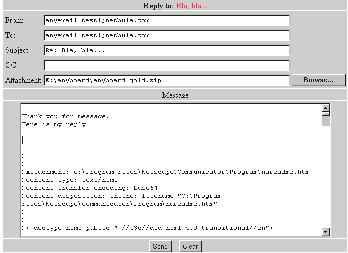
The send email form looks like the following

click here for detail
The meaning of the fields are obvious. To send an attachment along with an email message, click the Browse button and select a file to be attached.
When you are forwarding a message, the original message is not included in the message box. AnyEmail knows you are forwarding the message, it will get the message from the POP3 server and send it directly to the SMTP server.
 Configurations
AnyEmail has various configuration parameters to set the look & feel of the interface. These are changed by setting the variables inside the script.
Look & feel settings
The meaning of following are rather obvious
$show_reply_form_on_msg display reply form after message body
$dont_show_title Don't show email address in title
$exit_msg The html code sent when user logs out. Default directs user to netbula.com.
@bgcols =qw("#ffffff" "#dcf4f8"); Background colors of message list line
$form_color= qq("#cccccc"); background of the compose form
$cmd_pane_color= qq("#ccccff"); #background of the command pane
$low_pane_color= qq("#ffffff"); background of the message window
$bar_bg_color=qq("#eeeeff"); background of the command bar
Frame layout settings
AnyEmail allows you to choose different frame layouts.
The AnyEmail interface has three kinds of pages
- Command panel ---- the page that contains the command links, such as Compose, Logout, etc.
- Message list ---- the page that contains the list of email.
- Message ----- the page that shows the message content and the compose message form.
To set a layout, one first define the top level frameset in the $top_win_layout variable.
Example 1. (default)
$top_win_layout=<<"EOF_OF_LAYOUT";

						<frameset cols="150,*" border="0" marginwidth=0>

						<frame name="panel" border="0" src="COMMAND_SRC_URL">

						<frame name="list" src="LIST_SRC_URL" border=0>

						</frameset>

						EOF_OF_LAYOUT
Here, we put the command panel to the left frame (named panel) and the message list on the right frame (named list). We then defines three variables which determine where to display the various pages..
$list_tgt = "list"; # window/frame name of mail lists

							$cmd_tgt = "panel"; # window name of command

							$msg_tgt = "list"; # window name of message body
What we are saying is
- show email list in the frame named list
- show message content in the frame name list
Example 2. (3 frames)
$top_win_layout=<<"EOF_OF_LAYOUT";

						<frameset rows="30%, 70%" border=2>

						<frameset cols="150,*" border="0" marginwidth=0>

						<frame name="panel" border="0" src="COMMAND_SRC_URL">

						<frame name="list" src="LIST_SRC_URL" border=0>

						</frameset>

						<frame name="message" src="HELP_SRC_URL" border=1>

						</frameset>

						EOF_OF_LAYOUT


						$list_tgt = "list"; # window/frame name of mail lists

						$cmd_tgt = "panel"; # window name of command panel

						$msg_tgt = "message"; # window name of message body
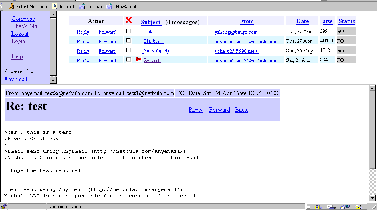
In the above, we defined three frames, named panel, list and message, and we also specified that mail list goes to list frame and message goes to the message frame. The resulting interface looks like this,

Click here for detail
Hope you now know how to try out your own layout.
Header & footers
These variables set the headers & footers on various pages, you can put logos, ads, etc.
$cmd_panel_footer
$list_win_header
$list_win_footer
$msg_body_header
$msg_body_footer
